These are notes for setting up a Raspberry Pi 4 single board computer for pro audio work. Specifically for running SuperCollider programs for interactive installations.
I used Raspbian Lite for this, since my intention is to run the Raspberry Pi in headless mode, meaning using no display and no desktop environment (to save resources).
It is presumed that you have installed Raspbian on an SD card, with ssh enabled (allowing you to log in to the pi over the network and execute commands using a terminal), and that you are logged in.
When logged in to the Pi via ssh, we can setup everything from the command line fairly quickly.
Before contacting me about this guide
Edit June 2021:
I get a ton of email about this post and the subject of Raspberry Pis because of it. While the majority of these are sympathetic, I unfortunately don’t have time to answer all of them, sorry. With that out of the way, let’s continue on our journey.
Preparing the Pi
You may skip this step if you already have a Raspberry Pi setup with ssh and you are logged into it. Otherwise, here are the steps needed to get access to a fresh Raspbian Lite installation from another computer.
Installing Raspbian Lite
To install Raspbian Lite on an SD card, plug the card in to your computer.
Then download the Raspbian Lite image.
Next, flash it onto your SD card. The easiest way to do this is by using Balena Etcher. With this program you can open up the image for Raspbian Lite, choose the SD card and click flash.
Note: On some Linux systems you may need to start Balena Etcher using sudo to allow it access to the SD card.
Enable ssh
With the flashed SD card containing your Raspbian Lite installation still in your computer, find the boot folder on it. Create an empty file here called ssh.
This will enable ssh upon boot and allow us to control the Raspberry Pi remotely.
Setup default WIFI-network
To automatically connect to your WIFI network on startup, you need to add another file to the boot folder.
This one should be named wpa_supplicant.conf which will contain information about your network.
You can copy and paste the snippet below into this file, but make sure you do the following edits to it:
- Replace the string in the
ssidline with the name of your network. - Replace the string in the
pskline with the password your network. - Replace the country code in the
country=NOline (I am in Norway = NO).
ctrl_interface=DIR=/var/run/wpa_supplicant GROUP=netdev
update_config=1
ap_scan=1
fast_reauth=1
country=NO

network={
	ssid="Your network's SSID"
	psk="Your network's password/psk"
	id_str="0"
	priority=100
}
Save the file, put the SD card back into your Pi and plug the power cord into it to boot it. Wait a few minutes for it to boot.
ssh: Log in to your Raspbian Lite remotely
If you followed the steps above, your Pi should now be connected to the same network as your computer.
To do this, you need the IP address of the Pi. See this article which contains some nice ideas on how to do this.
Once found, you can log in from your computer by opening up a terminal and executing ssh pi@address, replacing “address” with the actual IP address. If succesful you should now be prompted for the password of the pi user which by default is raspberry.
Special note for kitty users
If on your host computer you are using kitty as your terminal emulator you may experience some annoyances if you ssh using the normal ssh command. This is because the Pi isn’t recognizing your terminal type.
You can fix this by from your computer ssh’ing using kitty +kitten ssh instead.
I made an alias for this so that I can just type kssh. If you want an alias on your system, add this to your $HOME/.bashrc file on your computer (not the Pi) if you are using bash as your main shell or $HOME/.zshrc (if using zsh as your main shell):
alias kssh="kitty +kitten ssh"
And then restart your system or resource the file using source $HOME/.bashrc or source $HOME/.zshrc.
Important packages and dependencies
Run this command to install git and perl which are important packages you will need later on.
sudo apt update && sudo apt install git perl
Optionally you can install these programs as well which are nice (vim is a text editor, htop is for monitoring system resources and tmux is for multiple terminal windows). They are optional but I always use them.
sudo apt update && sudo apt install vim htop tmux
Tuning the system
The following commands are based on the canonical instructions for tuning your linux system for audio work.. Warning: These will alter config files on your system, use at your own risk and only on a fresh Raspbian installation.
I gathered these in a handy gist, so you can execute them just by copy-pasting this (extremely long due to gist url’s) command:
git clone https://gist.github.com/madskjeldgaard/c5731e95bc5be9b3e2789b14b1149b6e && mv c5731e95bc5be9b3e2789b14b1149b6e raspiaudiotune && cd raspiaudiotune && chmod +x raspiaudiotune.sh && ./raspiaudiotune.sh && cd ~ && rm -rf raspiaudiotune
This is the full script:
To make these changes take effect, the pi must be rebooted
sudo reboot
Install and setup jack
Jack is used to patch audio throughout your audio system on Linux. In this case we will mostly use it to patch audio from software to the hardware output.
Let’s install and setup jack:
# Install jack
sudo apt-get install jackd2
Jack has a configuration file in ~/.jackdrc that we will set up on installation, but you can edit this anytime to tune the system’s settings using a text editor by running nano ~/.jackdrc for example or vi ~/.jackdrc. The config file consists of a jackd command which will be run by SuperCollider when we boot the audio server in there.
# Create config file in home folder called .jackdrc
echo /usr/bin/jackd -P75 -dalsa -dhw:1 -r44100 -p512 -n3 > ~/.jackdrc
Explanations of the flags used here:
-P75- the real-time priority of the audio-dhw:1signifies the device number used to connect to jack. You can get a list of available devices to choose from usingaplay -lthen change the number1to whatever you like. 1 is usually the USB card.-r44100is the sample rate.-p512is the block size. This can be tuned to achieve lower latency. Must be power of two. I get latencies around 3-4ms with this set to-p64.-n3- jack’s buffer periods. Jack recommends using 3 here for USB devices.
Additionally, Fredrik Olofsson pointed out to me that it can be useful to use the -p-flag to restrict the number of possible ports for jack to connect to, this reduces the amount of ram used, which is why the SuperCollider readme recommends adding the -p16 flag to the jack command in .jackdrc.
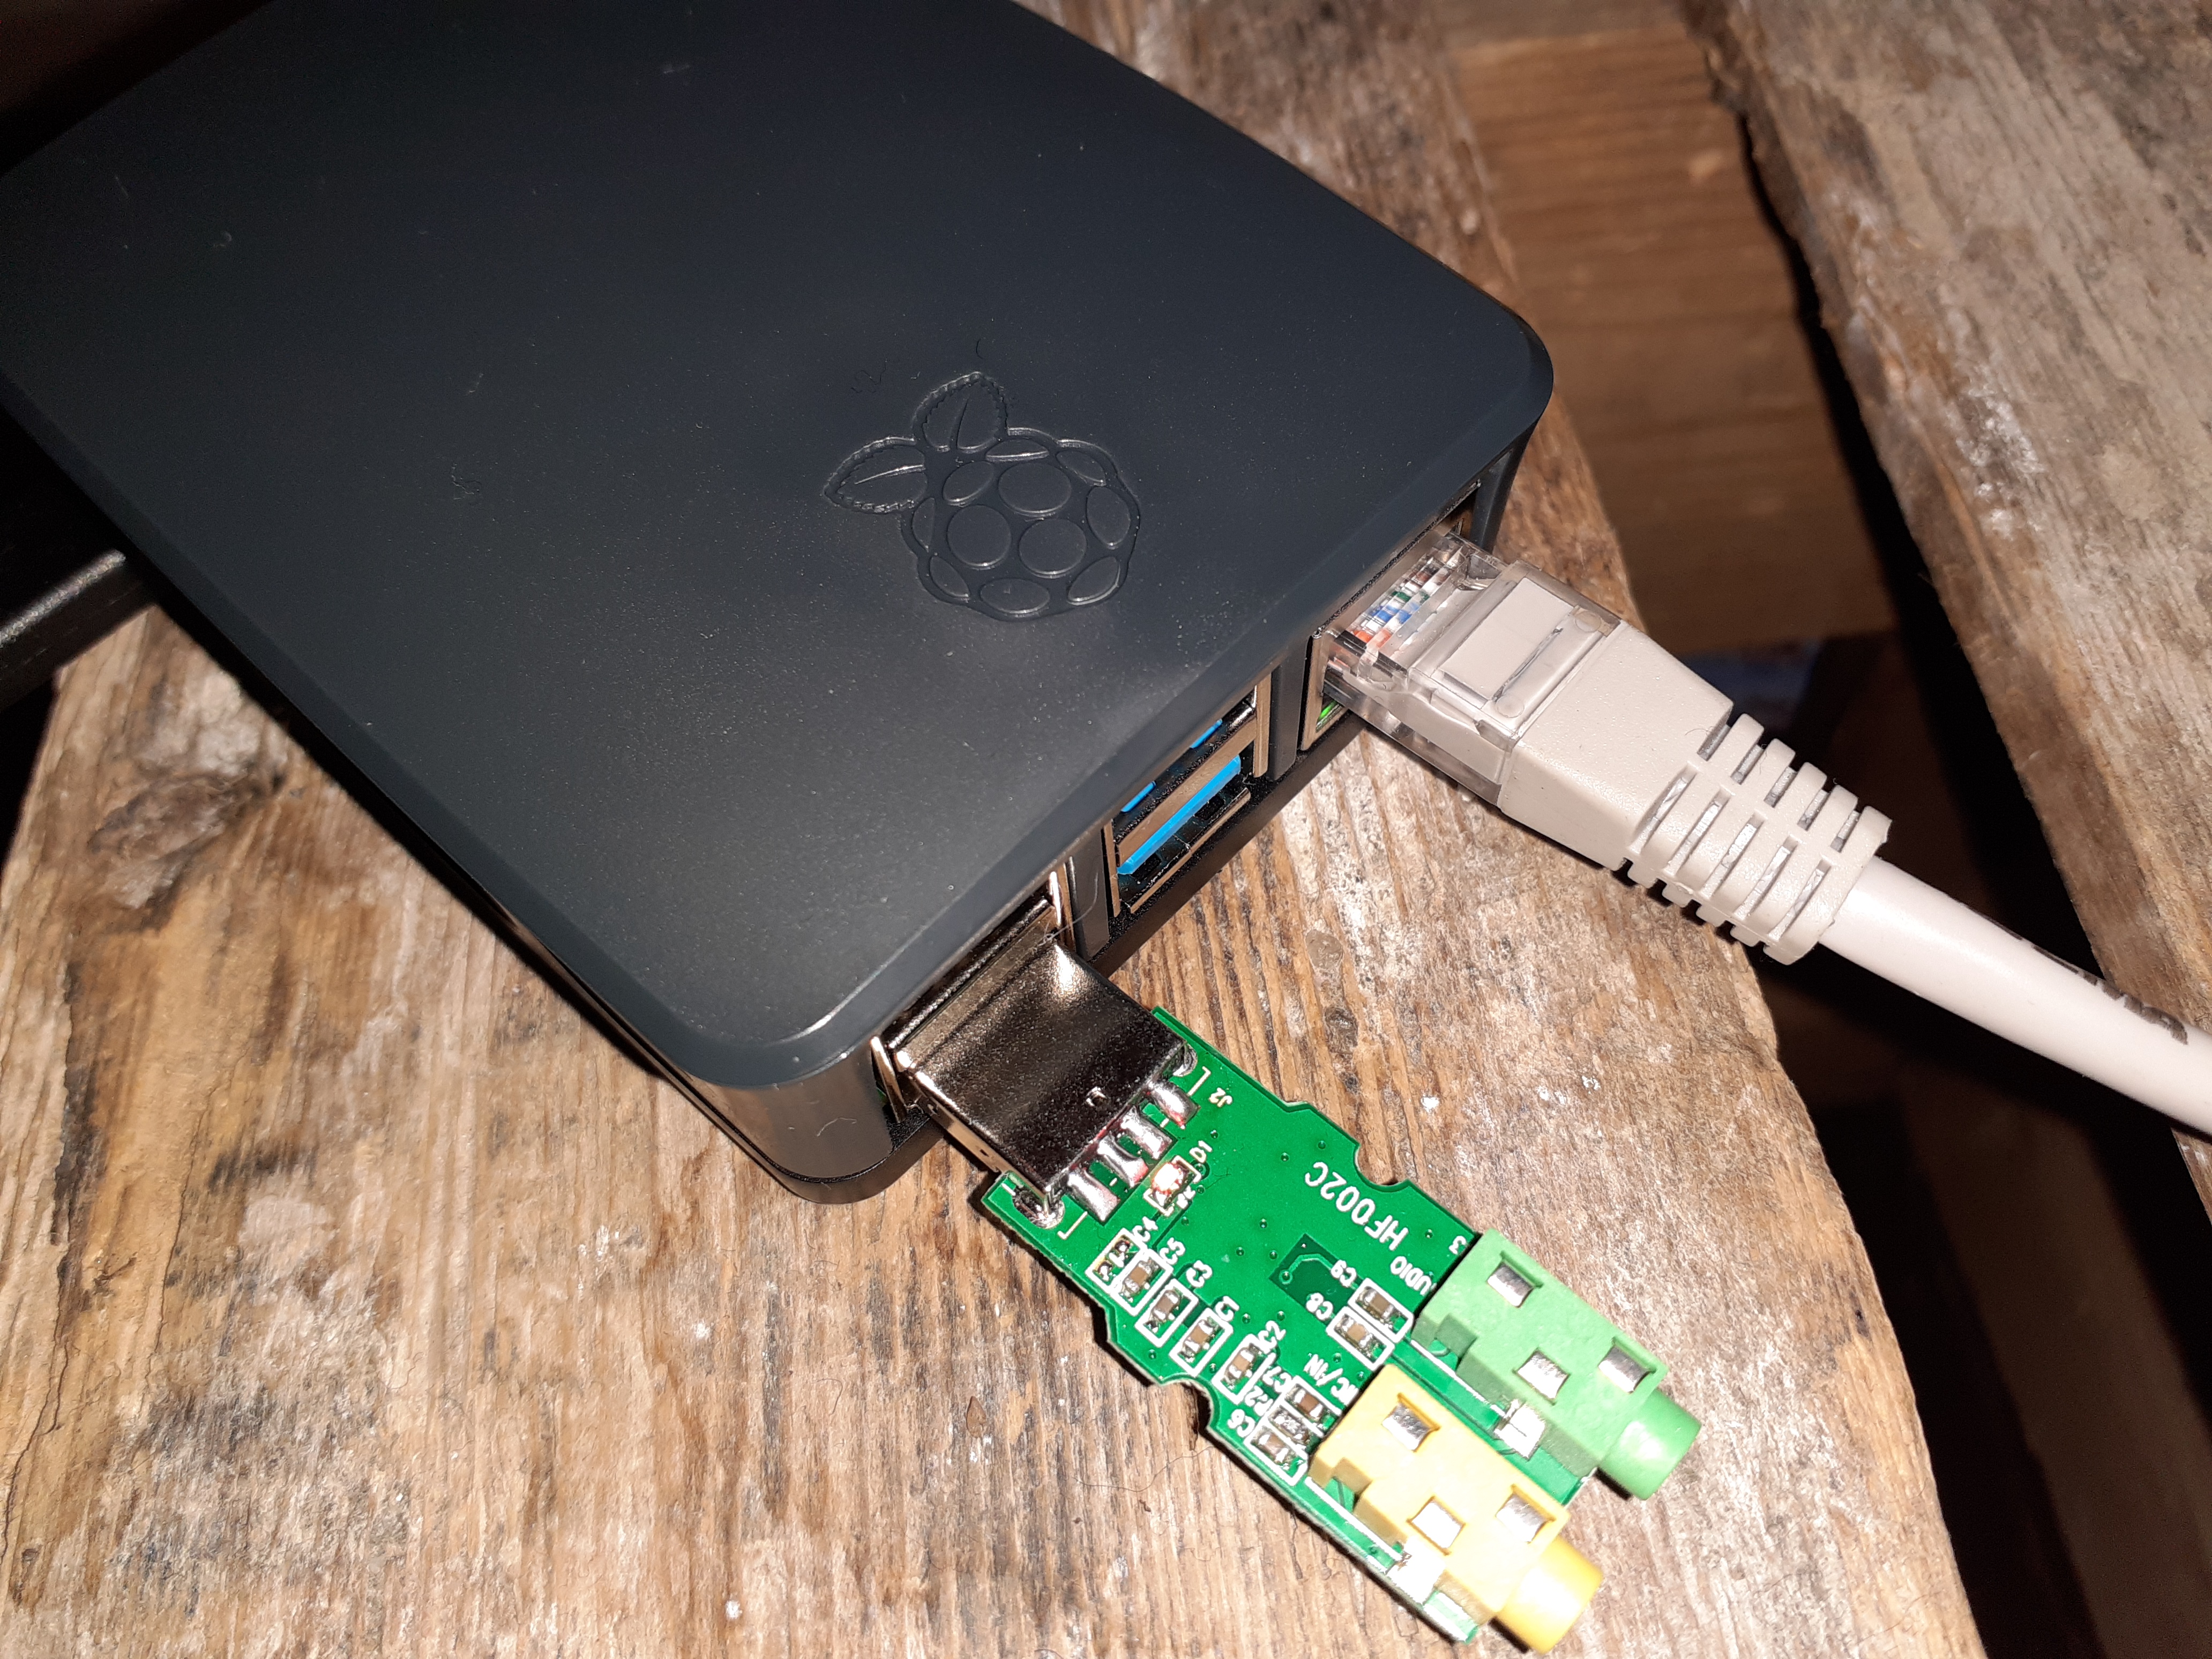
Changing audio interface
Never use the built in audio jack on a Raspberry Pi for anything serious. Instead, you can use any class compliant USB audio interface. These range from cheap 1$ Chinese ones to top-of-the-line RME Fireface UCX. I use and like both of these for different situations.
To see which audio interfaces are available on the pi:
aplay -l
With a USB-interface plugged in, the output should look something like this:
**** List of PLAYBACK Hardware Devices ****
card 0: ALSA [bcm2835 ALSA], device 0: bcm2835 ALSA [bcm2835 ALSA]  Subdevices: 7/7
  Subdevice #0: subdevice #0
  Subdevice #1: subdevice #1
  Subdevice #2: subdevice #2
  Subdevice #3: subdevice #3
  Subdevice #4: subdevice #4
  Subdevice #5: subdevice #5
  Subdevice #6: subdevice #6
card 0: ALSA [bcm2835 ALSA], device 1: bcm2835 IEC958/HDMI [bcm2835 IEC958/HDMI]
  Subdevices: 1/1
  Subdevice #0: subdevice #0
card 0: ALSA [bcm2835 ALSA], device 2: bcm2835 IEC958/HDMI1 [bcm2835 IEC958/HDMI1]
  Subdevices: 1/1
  Subdevice #0: subdevice #0
card 1: UCX23906524 [Fireface UCX (23906524)], device 0: USB Audio [USB Audio]
  Subdevices: 1/1
  Subdevice #0: subdevice #0
Note the card number. Card 0 is the trashy jack on the pi. Card 1 is the USB audio interface.
Disable the on-board audio output
To disable the useless on board jack output on the raspberry pi open up the boot config file
sudo vi /boot/config.txt
Find the line that says dtparam=audio=on and comment it out so that it looks like this:
#dtparam=audio=on
Then reboot, and run aplay -l to verify it isn’t there anymore.
Install a real-time kernel
One of the most important things you can do to improve any Linux system’s audio performance is installing a real-time-kernel. On the Raspberry Pi, you need to compile this kernel yourself. There are instructions for doing so here.
Compiling a kernel takes a lot of time, but my colleague at Notam, Thom Johansen, has built a great RT-kernel for the Raspberry Pi 4 that you can download here. For any other kind of Raspberry Pi, you are on your own (see the link above which has a guide for how to do this).
A big fat warning: It’s a good idea to back up your sd card at this point, if you have important data on it. Screwing up the kernel installation can get you in a complicated situation.
If you are on a Pi 4, then proceed by executing these commands to download and install the kernel:
mkdir rtkernel && cd rtkernel
wget https://users.notam.no/~thomj/rt-kernel.tar.gz && tar xzf rt-kernel.tar.gz
cd boot
sudo cp -rd * /boot/
cd ../lib
sudo cp -dr * /lib/
cd ../overlays
sudo cp -d * /boot/overlays
cd ..
sudo cp -d bcm* /boot/
and then add the following lines to /boot/config.txt by executing sudo vi /boot/config.txt:
[all]
kernel=kernel7l
Then reboot the pi by executing sudo reboot, wait a few minutes and then ssh into the pi again.
If you then run uname -a you should get a result along these lines:
Linux raspberrypi 4.19.71-rt24-v7l+ #2 SMP PREEMPT RT Sat Apr 25 22:04:08
UTC 2020 armv7l GNU/Linux
Check your system’s configuration
If you haven’t rebooted yet, go ahead and sudo reboot. And then wait for the Pi to power back up again before ssh’ing in to continue.
realTimeConfigQuickScan is a really nice script that you can use to see if your system is setup correctly. Download and run it like this:
# Scan system
git clone git://github.com/raboof/realtimeconfigquickscan.git
cd realtimeconfigquickscan
perl ./realTimeConfigQuickScan.pl
Download, and compile latest version of SuperCollider
You can run many different kinds of software on the Raspberry Pi headless: Pure Data, Csound and SuperCollider are a few free and open source options.
I personally prefer SuperCollider so that’s what I’m going to use here.
The easiest way to compile and install the latest version of SuperCollider is to use lvm’s build scripts. I created my own modified version of them which are tailor fit to a headless Raspberry Pi install.
Run these scripts by executing this massive oneliner:
git clone https://gist.github.com/madskjeldgaard/10ab025993d5b77d235819d56c4cc908 && mv 10ab025993d5b77d235819d56c4cc908 scbuildscripts && cd scbuildscripts && chmod +x *.sh && ./build-sc4pi.sh && ./build-sc3-plugins-pi.sh
Testing your SuperCollider installation
Let’s create a simple SuperCollider test file which will boot the audio server (and automatically start and connect Jack) to see if the installation went well and we are getting sound out of the pi.
# Make a SuperCollider file for testing.
echo "s.waitForBoot{ play{PinkNoise.ar(0.5).dup(2)} }" >> test.scd

# This will boot the server and play white noise in 2 channels
# Stop it by hitting Ctrl+d on your keyboard
sclang test.scd
Editing SuperCollider files
As shown above, you can run any SuperCollider file by passing it as an argument to sclang on the command line.
If you just have a finished SuperCollider-file that you want to run, then this is probably fine. You can use any text editor to make small edits to your files (vi, nano, vim/nvim or emacs are popular choices).
But, really, this isn’t a great way of working.
NeoVim and scnvim
My preferred way of working (on any computer, single board or not) is using a combination of NeoVim and the scnvim plugin.
To get this combination to work properly, unfortunately you cannot just install NeoVim using Raspbian’s package manager since we need a fairly new version of NeoVim to get it to work (and Raspbian/Debian typically has pretty old “stable” versions in it’s package manager).
Follow the instructions here (look for Debian things, this should be the same on Raspbian) to build NeoVim from source. The neovim wiki is the best place to find instructions on this, but I will condense the commands I used to build neovim on Raspbian below:
# Dependencies
sudo apt-get install ninja-build gettext libtool libtool-bin autoconf automake cmake g++ pkg-config unzip

# Get the neovim source code and switch to the stable branch
git clone https://github.com/neovim/neovim && cd neovim && git checkout stable

# Build and install
make -j4 && sudo make install

# Remove source files
cd ..
rm -rf neovim
Now, verify that NeoVim is installed by running the following command:
nvim --version
If you get any output from that command, you are good to go and can proceed to install scnvim by following the instructions on the project’s github repo.
# make a neovim config file
mkdir ~/.config/nvim
echo "call plug#begin()
Plug 'davidgranstrom/scnvim'
call plug#end()" > ~/.config/nvim/init.vim

# Install the vim-plug plugin manager
curl -fLo ~/.local/share/nvim/site/autoload/plug.vim --create-dirs \
    https://raw.githubusercontent.com/junegunn/vim-plug/master/plug.vim

# Open nvim and install the scnvim plugin
nvim -c ":PlugInstall"
Exit neovim when it’s done installing the plugin, then finish the scnvim integration by symlinking the SuperCollider classes that came with the plugin to the extensions folder of SC:
mkdir -p $HOME/.local/share/SuperCollider/Extensions/scide_scvim
ln -sf /home/pi/.config/nvim/plugged/scnvim/sc /home/pi/.local/share/SuperCollider/Extensions/scide_scvim
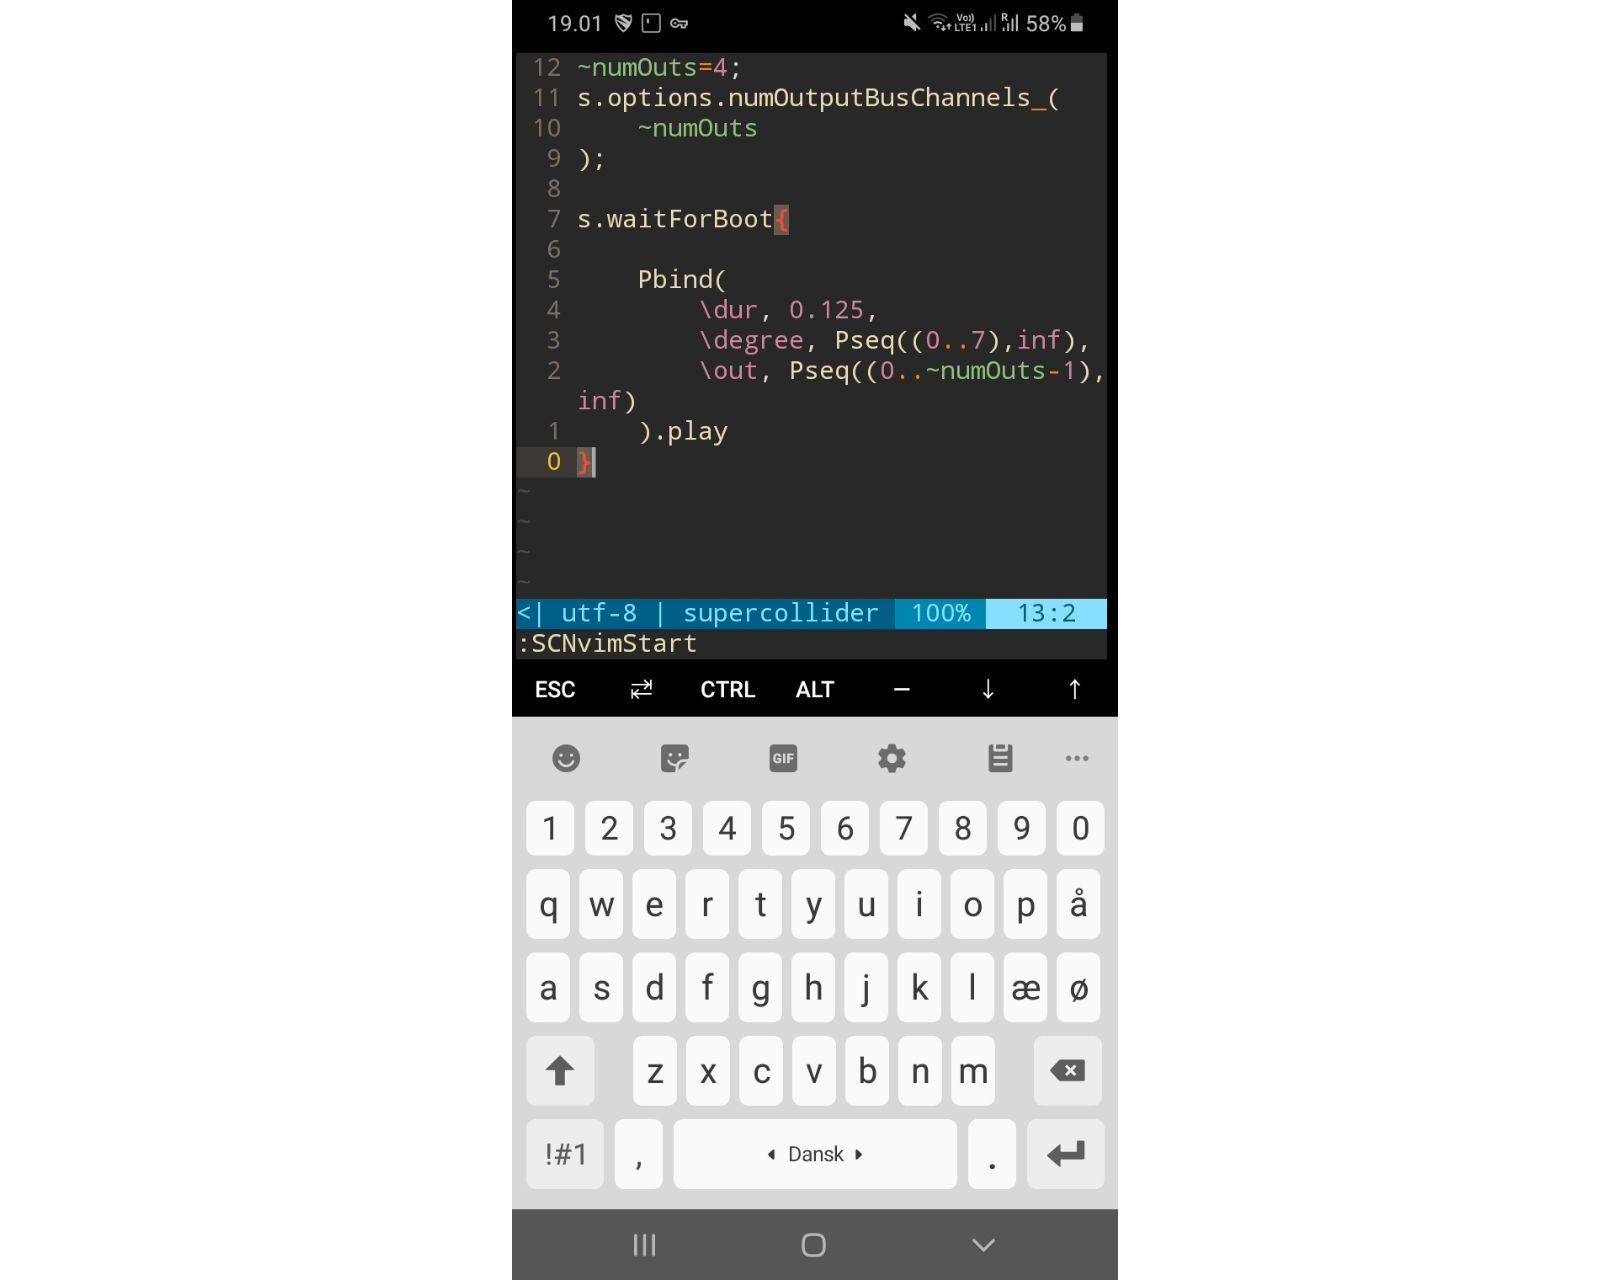
You should now be good to go. Open up the test.scd file from before and edit it:
# Open a SuperCollider file and start SCNvim on startup (by running the :SCNvimStart command)
nvim test.scd -c "SCNvimStart"
Controlling the pi using a phone
If you installed ssh on your Raspberry Pi you can access it from any computer using the ssh program.
A fun thing about this is that if you have an Android phone you can also use that to access your Pi. I have no idea why you would do that but it’s not up to me to judge.
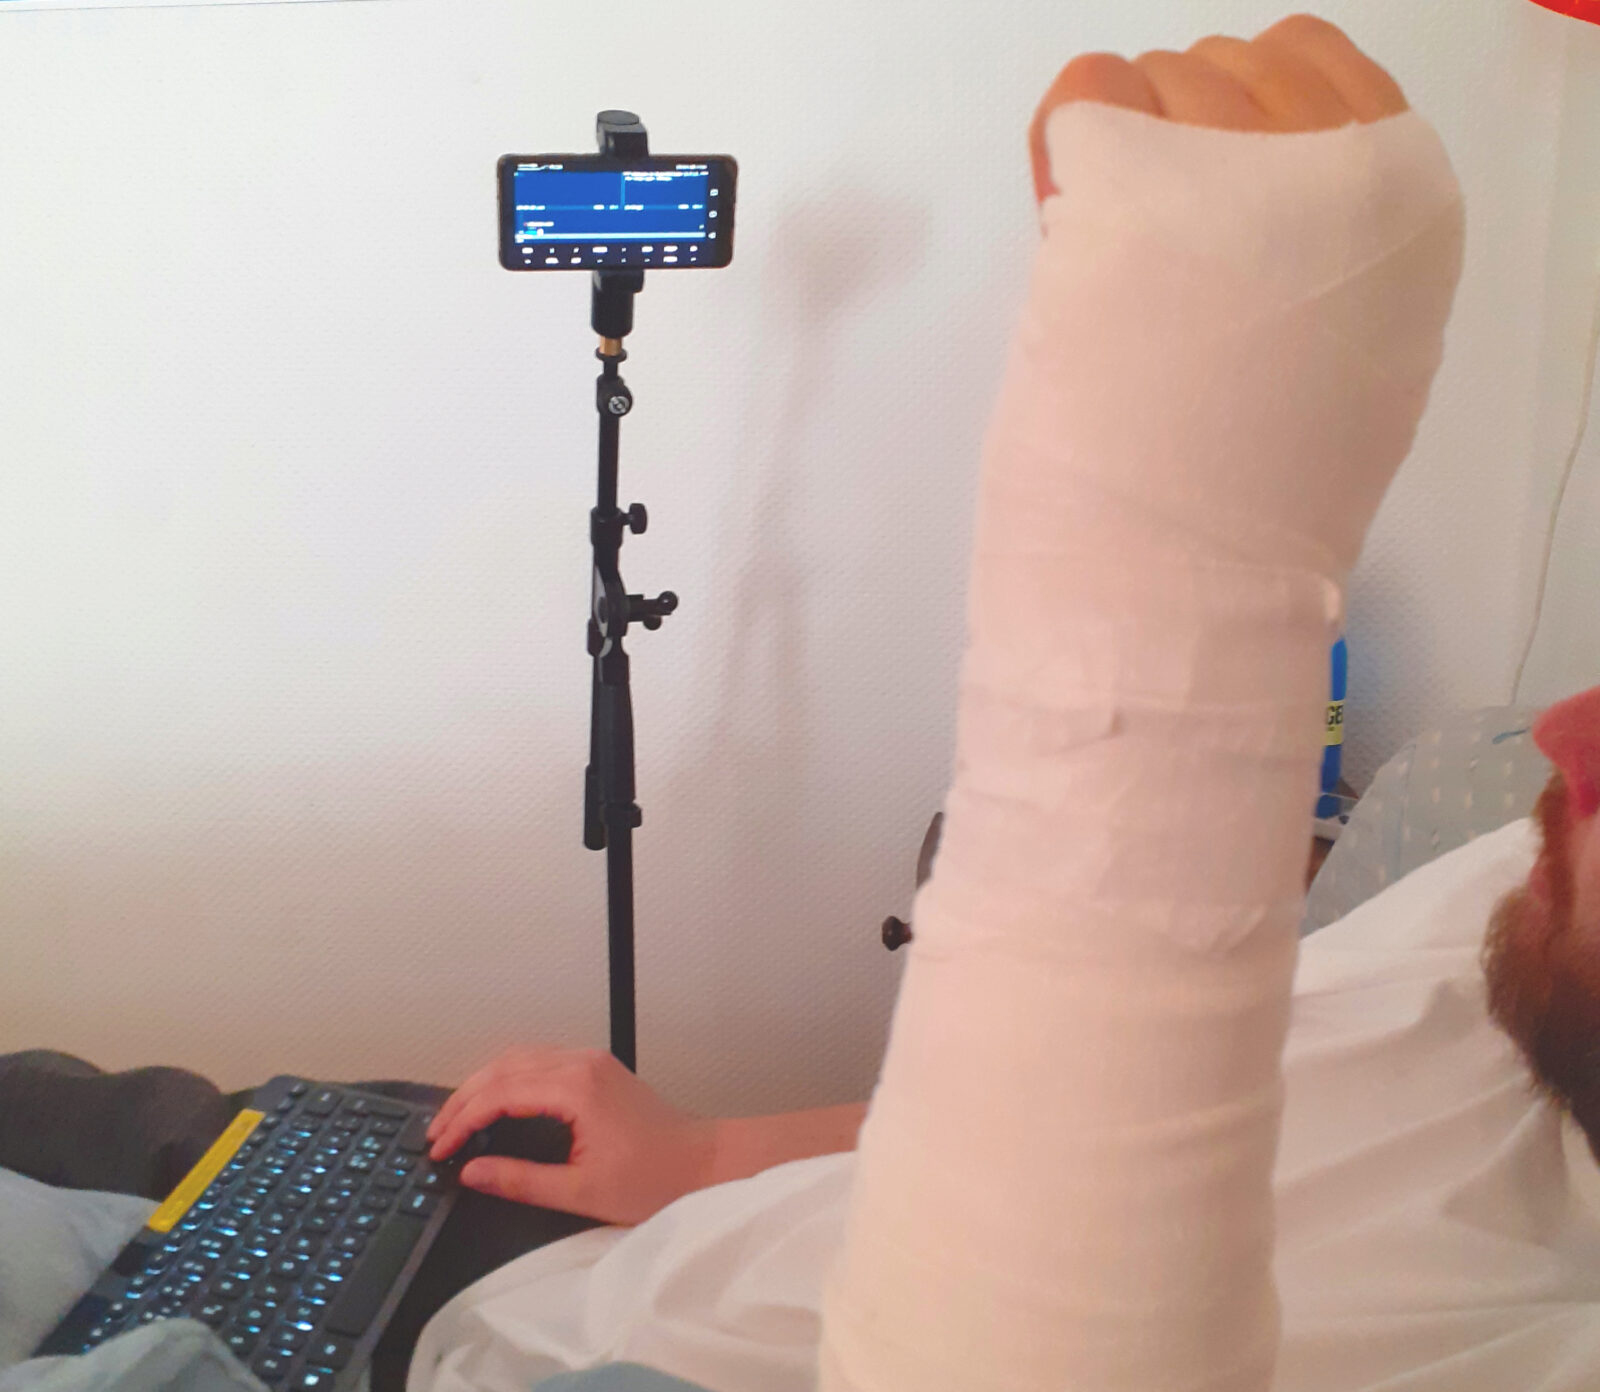
My friend actually used this trick to livecode SuperCollider on his Raspberry Pi while recovering from a broken arm.
To access your Raspberry Pi using your Android phone follow these steps:
On your phone:
- Install termux.
- Open up Termux, type and run the following command:
pkg install openssh. This will install ssh and let you log in to your Raspberry Pi from your phone. - Find the address of your Pi on the network and ssh into it in Termux using this command (change the IP to whatever the ip of your pi is):
ssh pi@10.0.1.51
And now you’re in your Pi on your phone and can do everything you would be able to with a computer ssh’d into your Pi.
Using the Raspberry Pi for networked audio
This blog post describes a way to use the Raspberry Pi in a networked audio configuration.
Watchdog
If you are using your Pi for an installation, setting up a watchdog can be a good idea. If your Pi gets overexcited or crashes, the watchdog will reboot the system (which as a consequence will trigger whatever startup script you have installed, if any).
sudo apt install watchdog
Open up the config file for the watchdog: /etc/watchdog.conf
And uncomment/add the following:
max-load-1 = 24
min-memory = 1
watchdog-device = /dev/watchdog
watchdog-timeout=15
The watchdog can be run and activated automatically using systemd. This is done using the following commands:
sudo systemctl enable watchdog
sudo systemctl start watchdog
To test if the watchdog is doing it’s job, you can stress the system by creating a so-called fork bomb which will make the system crash by recursively calling a function until the Pi chokes up.
On the pi (not your main computer!), execute the following fork bomb:
forkbomb(){ forkbomb | forkbomb & }; forkbomb
Wait a bit and then see your pi crash. After choking up, it should automatically reboot itself. If it does this, your watchdog is doing it’s job.
Backing up images
It is possible to back up and compress your SD card containing your Raspberry Pi installation so that it’s easy to recall later on, flash it to more cards or share it online.
See the official guide for this.
But in a nutshell:
On your main (unix/Linux) computer:
Run lsblk in a terminal to see which partitions are available.
Then plug in the sd card from the Pi into the computer and repeat the command above and see which partition was added. This is your sd card. Look at the size to verify that it matches your sd card.
Normally this is called something like sda or sdb but on my Arch Linux computer it looks like this, where the mmcblk0 is the sd card:
NAME MAJ:MIN RM   SIZE RO TYPE MOUNTPOINT
mmcblk0
│    179:0    0  29,7G  0 disk
├─mmcblk0p1
│    179:1    0 440,6M  0 part
├─mmcblk0p2
│    179:2    0     1K  0 part
├─mmcblk0p5
│    179:5    0    32M  0 part /run/media
├─mmcblk0p6
│    179:6    0   256M  0 part /run/media
├─mmcblk0p7
│    179:7    0  19,5G  0 part /run/media
└─mmcblk0p8
     259:4    0   9,5G  0 part /run/media
nvme0n1
│    259:0    0 238,5G  0 disk
├─nvme0n1p1
│    259:1    0   512M  0 part
├─nvme0n1p2
│    259:2    0   230G  0 part /
└─nvme0n1p3
     259:3    0     8G  0 part [SWAP]
Then, using the information that the mmcblk0 partition is the sd card, we can run the following command to first create an image from the partition and then compress it into a tarball ( warning: the resulting files may be quite large, depending on the size of the sd card! ):
sudo dd bs=4M if=/dev/mmcblk0 | gzip > mega-badass-pi-image.img.gz
Preconfigured images
Niklas Adam has done us all a favour and made preconfigured images available which are already setup for audio work. So if you don’t feel like going through this setup process, you can simply download one of them and flash them to a card and you are good to go.
Among other things, there are preconfigured images for Arch Arm !